Love the enthusiasm, but put your hands down now, please.

“Tom, what do you think? Why has the writer used this term to describe this character?”

Words to make your heart sink. Why has the teacher asked me? I haven’t got my hand up.

“Erm… I’m not sure, Miss.”

“Tom, can we have 5 minutes at the end, please?”

Even more words to make your heart sink.

This is a brief extract of a year 10 English lesson. I’m Tom and I’m the young man sitting in the classroom, coasting through my English lessons, half reading the book, half day-dreaming about the cricket match I’ve got at the weekend. September of Year 10, I had a new English teacher. And she made it clear that, in her classroom, everybody should be thinking and everyone’s voice is valuable.**

I am privileged in my role to teach across a range of year groups (KS3-5) and see lots of other teachers too. Something I have been reflecting on recently is how I a) make students think and b) how I can check their understanding things.

I have undertaken a (highly unscientific) experiment in my own classroom in the last couple of weeks to capture a small insight into a) and b) and my own practice. Every time I asked a question to the class, I made a note of which students answered. I did this by making a note on my seating plan – which I either carry around with me or have on the desk – building a tally overtime. I did this for a few different groups over a two week period and noticed something quite stark. I wasn’t speaking to *everyone* in my classes. I spoke to everyone in the sense of a greeting and the register but I wasn’t actually speaking to them about *geography*. I had, inadvertently, slipped into a bad habit of accepting hands up or calling out. What this served to do was to allow the conversation/classroom talk to be dominated by a fairly small (about 25% of the class) number of students.

This is obviously a rubbish experiment because I was aware that I was tracking this, so would have unconsciously changed my behaviour, probably mis-tracked some of the questions and didn’t do anything to record any paired/group talk.

In spite of this, I was struck by what I had found out. Prior to my ‘experiment’, I had expected that every student in every class would be spoken to *at least once* per lesson. That didn’t happen. Ouch.

This gave me pause to stop and reflect. So much of what I (and we, as teachers) we do in the classroom every day is automatic. Teaching is an inherently complex and busy activity to undertake, inevitably we retreat to what’s expedient. In this case, this meant me accepting hands up from my students.

This week, I am going to spend some time – near the start of the lesson – explaining to students that I don’t want hands to be raised to answer questions. I will explain that I have thought about the questions I want to ask and I want everyone in the room to have the chance to think about the question and to answer it. I will explain how this will work; I will ask a question, give thinking time for everyone, and then choose x number of people I’d like to hear from.

All sounds good, right? A solid application of ‘no hands up’, ensuring all students are thinking and know they could be asked a question. I also intend to inform my students that everyone in the class should expect to be asked a question, at some point. This is the part I am still tangling with, I ask a bundle of questions every lesson, but I also know that some questions will be ‘planned’ for some students. I need to break this habit, I need to plan questions which allow everyone the chance to answer and share their understanding. This means thinking hard about what I am wanting to cover with my students AND thinking about how I will make sure they understand what has been taught. Let’s have a look at an example:

Next week, I am looking at causes of flooding with year 10. The lesson will begin by exploring what a flood is, determining a shared understanding of what a flood is, and then considering what may potentially cause a flood. In this case, we will look at human and physical causes of flooding (as given in the AQA GCSE Geog spec). Questions I intend to ask include:

  1. What is a flood?
  2. Has a flood happened here (photo analysis)? How do you know?
  3. Why might a flood have happened here (photo analysis)?
  4. What has caused a flood in this image/map extract?
  5. What is increasing flood risk in this image/map?

A number of these questions can be posed to multiple students, especially questions 3, 4 and 5. I might expect students to build on/debate the answer given by someone else. The crucial thing is that I don’t allow students to raise their hands to answer – I need to be responsive to my class and think ‘Who might not have understood this?’. This is scary because that student may not have understood it, which means I have to re-teach it. But that’s OK, because if that one student hasn’t understood, there’s a good chance others might not have understood it too… And we want to make sure everyone gets it before we move on.

By not allowing my students to raise their hands, I am sending a clear message to the class. Everyone needs to be thinking about the question. Everyone needs to be ready to verbalise their thinking. Everyone’s voice is valuable and could be called upon at a any time. When I start doing this, I will be lavish in my praise for hearing the students speak and hearing them share, I will remind them that everyone’s contributions are valuable. I will remind them that, in this classroom, we should all be thinking.

But, what about those students who I don’t get to speak to? How can I check their understanding? Well, I can make use of whiteboards – which are a great tool – and ask everyone to show me an answer, scan the room, ask a few students to expand their answer or I can also live mark see what students have written during their independent work. I intend to write a little bit more, separately of this, on ‘making tasks work’ and the best ways to check for understanding (especially in a geography classroom).

This short post has been a reflection on my classroom practice and how I haven’t quite been getting it right just recently. This week, however, I will remind my classes that I *love* the enthusiasm of seeing them wanting to answer, raising their hands and stretching their fingers to show me how much they know. But, I’ll also ask them to, please, put their hands down because I want to be able to hear what *everyone* thinks.

**Needless to say, the day-dreaming soon stopped and the thinking hard soon started. I knew I couldn’t opt out in English, my teacher was clear. We all think in here and we’re all ready to answer questions. My English teacher, by having the courage to hear me mumble and stumble and share a half formed answer, gave me the courage (and the platform!) to share my ideas, to think hard and learn more about English than I thought I ever could. Thanks Miss.

Steve Waugh, James Vince and teaching

I hope you’ll indulge this slightly off-piste post. Let’s talk about cricket and, more specifically, two cricketers. The first one we’ll focus on is Steve Waugh and the second James Vince.

Steve Waugh no longer plays, having retired in 2004, but is known as one of the finest cricketers of the all-time. Notable for his role in the transformation of Australian cricket, I’m more interested in Waugh’s personal transformation. We’ll revisit that later.

James Vince is still playing professional cricket. Captain of Hampshire CCC (incidentally, the team I support!), Vince has played for England on a number of occasions, highlighting his considerable ability.

As any avid cricket follower will know, James Vince ad Steve Waugh are worlds apart. They have similarities – they’re both batsmen and both have considerable experience of captaincy. However, Steve Waugh will always be remembered as one of Australia’s greats and James Vince (at time of writing!) will always be remembered as a ‘player with all the shots’. Watching Vince bat is a joy – he can put a ball anywhere in the ground, he is slick, stylish and aesthetically pleasing. Watching Waugh, on the other hand, was a different experience (not just because of his pivotal role in demolishing England teams of the late 90’s and early 00’s…) because of his relentless grind and steadfast determination to bat for as long as he could to put his team in the best position possible.

This post germinated from an anecdote I’d heard about a young Steve Waugh. As he emerged into international cricket, he was an all-rounder, asked to contribute with both his batting and his bowling. As well as this, he embodied a much more attacking, flamboyant style of batting – with all the shots, he was slick, stylish and aesthetically pleasing… However, as his early Test record shows, he wasn’t laying the foundations for greatness he later delivered. Waugh, following a period of poor form, was omitted in the early 90’s – giving him time to go away and adapt his game. Waugh’s response to this omission was to simplify his game. Instead of worrying about being an attacking, flamboyant all-rounder he spent time making sure he was hard to get out and had enough shots to score plenty of runs so this meant reducing the style and crafting the core shots that would help. It didn’t end to badly for him either and the rest, as they say, is history.

What’s this got to do with teaching?!

This anecdote really struck a chord with me and made me think about my own approach to teaching. As a young teacher, I was determined to be brilliant at everything – I wanted to deliver pitch perfect explanations, I wanted to plan wonderful assessments, I wanted to ask the best questions, I wanted to know every part of my subject inside and out. I wanted to be the James Vince of teaching – slick and stylish – but with the world-beating outcomes of Steve Waugh. Naturally, this wasn’t the case and it led me down a dangerous path of following every fad, rushing and changing my practice, not going through a careful process of getting better.

How have I overcome this? Well, I had to have some difficult conversations with colleagues and leaders close to me and acknowledge that if I wanted to be the best teacher I could be, I had to get used to the grind and granular focus of improvement. This meant spending time focusing on some key elements of my practice – e.g. questioning – and working hard on improving my craft. This lead me to control the controllables.

Control the controllables

This was done through a deliberate process of observation – asking a small number of colleagues to observe me (acknowledging the limitations of observation!) – followed by discussion and reflection – whereby I would discuss with the observer what they’d seen, what I’d done and, crucially, what the students had done – before replanning and refining. In the case of questioning, this involved a more deliberate approach to questions – planning what I would ask, when I would ask it, how I would receive responses (Individuals? Whiteboards?).

This model of improvement has formed the basis of much of my approach to teaching. Naturally, as I have read more and come to learn more about the craft of teaching, I have been able to be more specific about my areas of focus. And this approach has also alleviated my worries that I am not in control of everything. For example, curriculum or assessment planning are best done in conjunction with subject teams and colleagues – these are big jobs that need careful plans – I am focusing here on the craft of the classroom.

Education has undergone a research revolution. And it’s been transformative and something that has fundamentally shaped my own practice. However, research isn’t a panacea. Teaching is a craft and, like all crafts, benefits from being shared and looked at and pored over and thought about. The research will offer a starting point but schools are such varied and complex places – research and evidence need to inform, not to create islands.

What am I working on now?

Right now, I am working on my explanations. The curse of knowledge tells us that we can all be guilty of thinking our explanations are perfect but the evidence – what I see in students books, what I get on student whiteboards, what I read in student assessments – tells me that this is an area I can be making some gains with. I’d love to be like James Vince, flamboyant and stylish, but I think I’d be better off being like Steve Waugh – doggedly working hard on a few core skills to sharpen them as much as I can. I’d love to hear what you’re working on and how you’re working to make it better too.

Satisfyingly, whilst I have written this blog this evening, James Vince has made a super 65 for Hampshire against Sussex. Played, skip.

Take notes – sometimes it’s OK to copy?

I’ve got to kick this off with a big old disclaimer. The following thoughts are based on my experiences as a classroom practitioner and therefore may not be rooted in research.

I wrote a couple of posts previously on the purpose of exercise books and booklets. In both of these posts, I make an argument for bookletising the curriculum and broadly I stand by those arguments (spoiler: kids can read loads). However, prior to the half term break I had a couple of evenings marking my students exercise books (we’ve not gone full booklet yet!) and had cause to reflect on what I was seeing/marking/giving feedback on.

If you were to ever see me teach, I tend to be fairly consistent. We begin our lesson with some form of bell activity/starter task/recap of prior knowledge, I spend some time explaining what we learnt previously and where we are going next and then I start teaching. For the purpose of this blog, teaching = I start telling my students some new stuff.

This teaching will often be supported by photographs or graphs/other visual aids and will involve me prodding and probing students understanding of what we’re looking at through questions. As we begin to unpick a new idea, I will begin to model notes on the whiteboard.

Let me use an example to illustrate. With year 9, we are presently completing a unit of study on Russia. This week our lesson question was ‘How developed is Russia?’ and we explored the concept of development in Russia, used and considered validity of development indicators and how development may have spatial variation as well as reasons for this. It was an enjoyable and interesting lesson.

The over-arching purpose of this post is to explore how the students engaged in the process of note-taking in this lesson. So, what happened?

We kicked off with 5 recall questions, challenging students to recall factual information about Russia from earlier in our unit of study. Students completed this independently and then self-assessed it as we shared answers. Following this, students completed their date and title, I explained where the lesson ‘fits’ in the learning journey and we made a start.

The first part of the lesson was to remind (re-teach?) students what we mean by the idea of development and how we would explore this together. On the whiteboard, I wrote down a definition of ‘development’ – in a geographical context – asking students to copy this after I’d done this. Following this, I asked students to consider what we could look at to best understand a country’s development. This was a deliberate question and I expected students to recall their prior knowledge of development indicators. Some students were more successful at this than others and I took feedback from students after they’d noted ideas on their whiteboards.

As I took feedback from this, I began to write notes on the whiteboard. For example, one student suggested we could look at the healthcare in a country – and with some nudging and supporting – we settled specifically on ‘life expectancy’. I added life expectancy to my whiteboard (under my definition of development and newly added sub-heading ‘How can we measure development?’) and a brief explanation of this. We continued this for a few more minutes until we had established a set of development indicators we would explore in the lesson. All the while, I added these to my whiteboard until we had a full list.

Then, I asked students to copy the whiteboard notes into their exercise books. I tried as hard as possible to ensure this was accessible to every student and supported students who I knew would struggle with this (copies of slides/lesson notes etc). After this, and before we moved on, I asked students to re-read their notes and think which indicator would be the most useful in answering our lesson question ‘How developed is Russia?’.

This is a brief insight into what I expect with note-taking and exercise books but I hope it’s illustrative of a wider point.

My students, as you can imagine, tend to write a lot in their books – with ~60% of their writing copied/heavily scaffolded from me. To avoid this becoming ‘death by copying from the whiteboard/visualiser’, I always pause and ask the students to review what we’ve written and engage with it – through a question, a rank order, a 3 point summary – the method varies but the key here is asking students to be active in their thinking.

What have I found?

  1. Students books tend to be better organised – making them a useful tool for revision and recap of previous content
  2. Students recall is better – Highly unscientific but this is observed via recap quizzes
  3. It’s helped me become more careful and specific in my planning – I need to know what I want to write/model before I start my lessons.

As the year has progressed and students have become more comfortable with my expectations of exercise books and how we use them, I have used the whiteboard/visualiser more sparingly in the teaching of new ideas. Instead, I abbreviate the ideas and ask students to augment the idea in their own words.

Dare I say it, this might strike a nice middle ground between full workbook booklets and no booklets at all…!

What’s the point of an exercise book?

I’ve been teaching for 9 years. In that time, I have never not used an exercise book. Every child who has passed through my class has been gifted a (usually green, don’t @ me, geography is always green) blank, lined paper book that will act as a physical manifestation of everything we cover in the classroom through that year.

The last 20 months have made me increasingly introspective about education, my values and what we’re trying to do. I can’t quite shake from my mind that the way we use exercise books (secondary school geography teacher here), or the way I’ve seen them used, isn’t really having any tangible impact. A typical lesson for me looks something like this:

  • Upon entering the room, students complete some sort of ‘do-now’ – quiz/gap fill/picture analysis
  • I will take feedback on this and offer praise/correction etc
  • Next – enter the exercise book! – I will instruct students to write their dates and titles. We have spent some time re-formatting out curriculum and have chunked our topics into a series of questions – the question becomes the lesson title/focus.
  • After we have done this, and I’ve circulated and checked, I will typically begin teaching.
  • This teaching is, invariably, me telling my students something, exploring how it links to what we already know and then adding increasing detail to this.
  • I will generally use my whiteboard/visualiser to illustrate whatever I may be talking about – some students may start to copy my notes (I certainly used to do this) – and I will ask students questions as I explain/teach and we will use this to add to the concept.
  • I will then support my students to apply this knowledge – this may be paired/individual work, but students will do some work in their exercise books. This may be a piece of writing, some sort of question, a diagram – it varies – but, the students work in their books.

All sound familiar(ish)? At some point in the lesson, students will do some work in their books – be that directed by me, or under their own steam. Why do we do this?

In an age of education where ‘curriculum is king’, and our inspectorate have made that a key priority for schools, should we rethink how we are using exercise books? We know, from Ofsted’s own inspection handbook. that at any inspection: “inspectors’ first priority during inspections is to collect first-hand evidence”. To gather this evidence:

Inspectors will visit lessons; scrutinise pupils’ work; talk to pupils about their work, gauging both their understanding and their engagement in learning; and gather pupils’ perceptions of the typical quality of education and other aspects of life at the school in a range of subjects.

Point 110, School Inspection Handbook, https://www.gov.uk/government/publications/school-inspection-handbook-eif/school-inspection-handbook

Therefore, this means I’ve got to have an exercise book, right? How can I possibly evidence the implementation of the curriculum without evidence?

Well… this is where I think education needs to be a little bit more bold. Rightly, schools will be inspected and, rightly, inspectors will challenge schools on what they are teaching their students and why they are teaching it. But,

Thus far this blog, for all its prolixity, hasn’t really said anything… My main question is ‘why do we bother using exercise books?’ because, as far as I can see, I don’t see a great case for persisting with them.

What’s the alternative?

I’m delighted you’ve asked/read this far – our students get about 15,000 hours(ish) in school (primary and secondary, I won’t tell Primary colleagues how to use their bit!) – so it matters that we use the time well.

For me, bookletising (only at A level so far) the curriculum has been absolutely transformative. Students a) get to read loads of stuff b) don’t have to worry about writing down everything I write on the board/they see on the board and c) have well organised, thought out notes ready to go. It means we can spend so much more time on getting students to think really hard about what we’re teaching AND to spend more time practising with it/applying it. Also, you haven’t got to spend time having battles about presentation/organisation of content, or chasing up missing notes. You can spend your time reading student work and checking their understanding or spotting their misconceptions.

How does a typical lesson look when I’m using a booklet?

  • Upon entering the room, students complete some sort of ‘do-now’ – quiz/gap fill/picture analysis
  • I will take feedback on this and offer praise/correction etc
  • Next, students will find the next page in their booklet. Together, we will discuss the lesson question (if applicable) exploring what we already know and what we will go on to.
  • I will read through the booklet text with my students – stopping to explore and unpack ideas, adding annotation and clarification – whilst asking questions and checking on students.
  • We will then look – together – at the planned activity. We will discuss how we might approach this – with me offering some support/scaffolds – before students complete this. Students do not have to worry about having missed anything – they have a page of notes already written and ready to support them – meaning they can think hard about the task at hand.
  • I will then take feedback from students/ask them to review their work.
  • Move on and repeat.

Am I worried what Ofsted will think about this approach? Yes, because I am fully aware of the power of our inspectorate, but I also think the last 20 months have shown me how important it is that my students maximise every second of their time in school. And, for me, booklets allow us the perfect opportunity to do that.

Of course, bookletisation comes with a bundle of barriers – cost, time, expertise being the primary issues – in which case, I would challenge teachers to massively rethink what they use their exercise books for. Go beyond the need to generate ‘evidence’ and think really hard about how you’re using them. The exercise book is ubiquitous in classrooms around the country and I’m really not sure why…

More thoughts on booklets here.

How I teach… the long and cross profiles of a river (AQA, GCSE)

We are a few weeks into the new academic year and I have spent some time reflecting on my new Y11 class. We’ve started the year with the ‘River landscapes in the UK’ element of the course. Interestingly, this topic doesn’t seem to attract the same sense of confusion that the GACM does but I think the early part of this unit can be equally tricky.

The shape of river valleys changes as rivers flow downstream.The long profile and changing cross profile of a river and its valley.Fluvial processes: erosion – hydraulic action, abrasion, attrition, solution, vertical and lateral erosionTransportation – traction, saltation, suspension and solutionDeposition – why rivers deposit sediment.

AQA GCSE Geography specification – https://www.aqa.org.uk/subjects/geography/gcse/geography-8035/subject-content/living-with-the-physical-environment#1_1_2 

Looking at what is outlined there, it’s actually quite complex. I know lots of geography curricula will have touched on ideas of erosion/deposition in previous years (glaciers, coasts, maybe even rivers) but these processes are often taught as discrete bodies of knowledge, removed from the bigger picture. When delivering the early part of the rivers unit, I think there needs to be plenty of time spent unpacking the long/cross profiles of a river and integrating these processes within that.

First step, unpacking the concept of a river

Students need to understand that rivers exist as a system, with interlinked parts, which have a (mostly) clear start and end point. We start by looking at the maps linked here on the WWF website.

I particularly like this map as it neatly illustrates the concept of rivers as a system and allows us to unpack the idea of drainage basins/watersheds. (Not included in the subject specific vocabulary list but undeniably helpful in this early part of the topic)

By using this map, we can zoom in on an individual river system (allowing the introduction of tributaries, the source and mouth and the watershed). I use this opportunity to introduce the River Tees – which is our case study – and start to build a sense of familiarity with the river. 

The map above (sourced from the Northumbria River Basin District Flood Risk Management Plan 2015- 2021) allows us to show how, as rivers flow across the landscape, their morphology starts to change. I haven’t introduced the courses of a river at this stage, but I do begin to show students that meanders begin to emerge in the river as it flows downstream. 

At this point, I would annotate a copy of the map above under my visualiser – showing the direction of flow, indicating changes to the river’s morphology, adding the tributaries, indicating the watershed. By covering some of this conceptual background, it allows students to make educated guesses about the processes and features of the river. 

Second step, introducing the courses of a river

With the underlying concepts established, I explain to students that as rivers flow from their source to the mouth, there is a shift in the landscapes they flow through. I illustrate this with the use of photographs and diagrams. The first diagram I use is a line drawing to show the long profile (a great example of such a diagram is shown on Internet Geography) and loosely divide this into three distinct sections – which I explain to students as the upper, middle and lower courses of a river. Following this, I supplement teaching key features of each course with photographs. Examples outlined below: 

Seven Sisters National Park, Cuckmere Haven, England

By using images like those shown above, students can see how the river is changing through its course – focusing on its width, depth and shape – and also how the relief may be changing. At this point, I am aiming for students to develop a clear understanding of how the river is changing – I typically draw a table and we add to this through our study of the images/teacher input. 

UpperMiddleLower
River width
River depth
Discharge 

By introducing these river features, we can also start to consider how the river’s velocity changes and how the amount of material being carried by a river changes too. Basically, the aim is to secure students’ understanding of what rivers do by gradually introducing its various features. 

At this stage, I make a conscious effort to explicitly teach students about changes in the river’s velocity. I have found teaching students about the river’s wetted perimeter (how much of the water is in contact with the river banks) helps them to understand why the river’s velocity increases downstream which explains why the river carries more sediment further downstream.

Before moving on, I will often use a series of photographs and OS maps to quiz students’ understanding of the course of a river. OS maps are particularly helpful as students can consider the relief of the land and the flow of the river across the land. 

Thirdly, the cross profiles

At this stage, students are familiar with the language of upper, middle and lower course and now students are introduced to the cross profiles of the river.

I teach this explicitly, under the visualiser/from the whiteboard, where I draw a diagram of each cross section, adding labels as I go (for example, vertical erosion is dominant in the upper course because of the steep relief in these areas). 

By teaching the cross profiles, students encounter the terminology of vertical and lateral erosion, which are important for later landform formation (e.g. floodplains). 

Teaching from an annotated diagram also allows me to introduce processes of erosion and transportation too (outlined in the specification linked earlier). Whilst these are taught discretely (again, use of diagrams) students are regularly quizzed on these, and asked to use them in their writing, when we move onto landforms (e.g. waterfalls).

As with the long profiles, when I have taught this, I use a series of photographs and maps to test student understanding. For example, if we were to study an OS map of the upper course, I would be asking students to recall features of the river (width, depth, velocity) along with features of the area (relief) and the processes dominant in the map (vertical erosion). 

Summing up

I think we can often overlook the importance of the early part of the rivers unit. If we can cover these basics of rivers early, it ensures the later learning (landforms, river management) exists in a stronger conceptual framework.

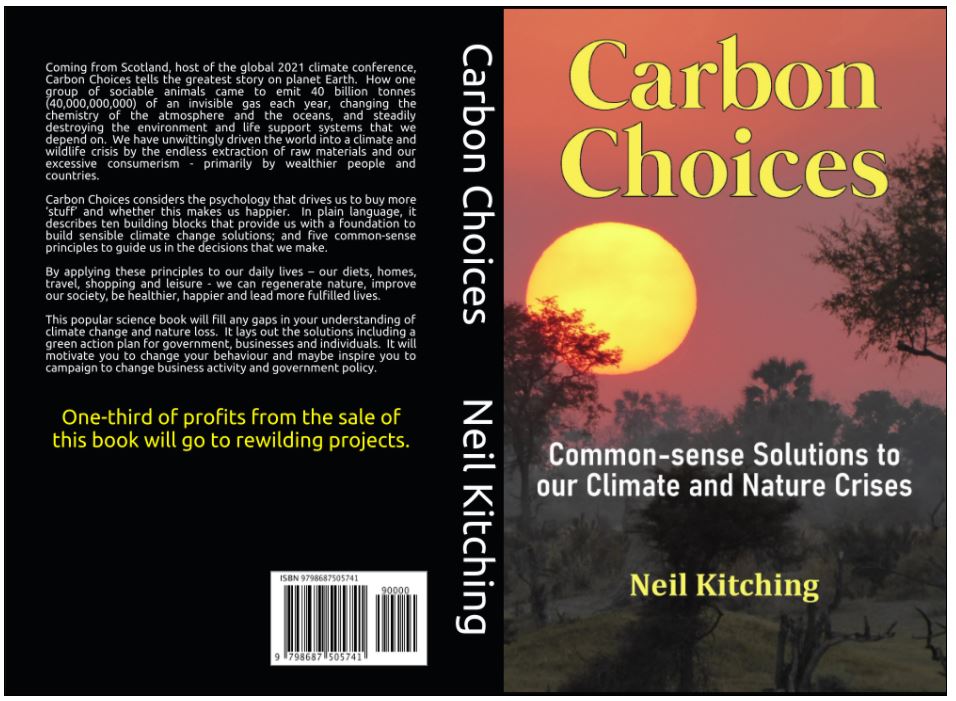
GUEST POST – Carbon Choices by @carbonchoicesuk

**Geographer Neil Kitching has recently published a book on the solutions to our climate change and nature crises. It is a comprehensive guide, written in easy to read language and as such contains ideal material for teachers to share with older students studying geography. In this blog, Neil talks about the solutions to our climate and nature crises from a geographer’s perspective.**

Geography is at the centre of climate and nature – the defining issues of the next few decades. Geography, the study of human impact and natural processes, provides the context and overview for pupils. Geography teachers should seize this opportunity to lead by example, albeit to also assist other teachers to embed climate change topics within their teaching.

Carbon Choices considers the twin environmental crises rooted in unsustainable development that humans face; that of climate change and loss of nature. The two are intertwined. Healthy forests, grasslands, savannas, wetlands, peatlands, soils, mangroves, sea grasses and coral reefs all absorb and store carbon dioxide. Conversely, human impacts and destruction of these ecosystems can often release this stored carbon leading to more emissions of greenhouse gases.

Carbon Choices explores the impact of humans – population and consumption – and the reasons why it is so difficult to tackle climate change. With a focus on Scotland, a small country trying to set a good example for others to follow, Carbon Choices also looks at UK and international examples of good and bad practice. It reflects personal experiences from trips to Greenland, India, Morocco, Lapland, Botswana and Namibia.

Neil at Bass Rock

We all know and understand that the use of electricity, driving, flying and heating our homes drives our carbon emissions. But the four ‘hidden’ elephants in the room are our excessive consumerism including fast fashion, our dietary demands including beef and dairy, society’s use of cement and concrete, and the refrigerant gases and energy used for cooling.

In Carbon Choices, I identify ten building blocks; including sensible economics, regulations, design, innovation, investment, education and behaviour change. These building blocks are the foundations to help us build a low carbon economy that works in harmony with nature. Without these in place, tackling climate change is at best, an uphill battle. Those who try to be ‘green’ find there are obstacles – we need to clear these. Governments can then set the policy direction and sensible regulations, businesses can respond and provide innovative low carbon products and services, and consumers will have the knowledge to make better carbon choices

The book then introduces five common-sense principles which government, business and consumers can use as a guide to make better decisions.

  1. Be fair across current and future generations
  2. Price carbon pollution 
  3. Consume carefully, travel wisely
  4. Embrace efficiency, avoid waste
  5. Nurture nature

By applying these principles to our daily lives – our diets, homes, travel, shopping and leisure activities – we can regenerate nature and improve our society, make us healthier, happier and lead more fulfilled lives.
The common-sense solutions to our climate and nature crises are summarised as:

 Reduce our need to travel and electrify remaining travel.
 Invest in innovative solutions to increase the efficiency of industry, decarbonise our electricity generation and heat production.
 Consume fewer manufactured goods, and for business to adopt circular economy approaches to what we do consume.
 Stop deforestation, restore degraded land.
 Shift to a plant-based diet.

Amidst all the bad news, there are grounds for hope – this popular science book concludes with a green action plan for government, business and individuals to make better Carbon Choices.

Carbon Choices is available on Amazon. One third of profits will be donated to rewilding projects. Further information can be found at www.carbonchoices.uk

Geography in the news? Yeah, OK.

Sometimes, you’ve got to hold your hands up and say you were wrong. I wrote this and stood by those words for quite a while. A lot of my thinking here was informed by my emerging understanding of ideas of curriculum, powerful knowledge, cognitive psychology and I probably lost sight of the subject…

If you haven’t read the post, the argument I present is primarily that we have a curriculum plan, carefully planned and sequenced, and any deviation away from that is a poor decision and disrupts the ground work we had laid previously. Looking back, I think I’ve gotten this quite badly wrong.

This past week has given me the real pleasure to features on the Geographical Association’s wonderful GeogPod podcast, in which I talked about curriculum planning and the power of geographical knowledge. In my conversation with John Lyon, GeogPod’s host, we discussed the idea of ‘floating topicality’. This idea is particularly pertinent to geography – I understand the term to mean that our curricula and our lessons should be open, and responsive, to the ever-changing world around us. At they very heart of it, geography is about reading and understanding our world. Geographical knowledge and ideas are transformational – they totally reshape the ways in which we see the world. As we are studying our world, too, many of these ideas naturally overlap and bleed into one another. It was Stephen Schwab’s comment on my original post that cited this too, and he’s not wrong – floating topicality gives us the space to update and refresh our plans.

Here’s an example. This week, I have been teaching my Y11 class about causes of flooding in their unit on rivers. We started the lesson looking at some of the recent footage of super typhoon Goni, which hit the Philippines last week, bringing vast flooding. Previously, I’d never have made the link – I’d have argued “It’s not on the plan”, but I’d being doing my students a disservice. By building this in, we could a) review our understanding of typhoons, their causes and their devastating impacts b) we could consider the causes of flooding (in this case, storm surges and heavy rain) and c) we could assess the Philippines hazard risk in view of this event. All told, this took 10 minutes of the lesson – but it was powerful and productive and it helped my students understand the ways in which geographical concepts can be interrelated.

That doesn’t mean I can do this every lesson all the time, but it has meant I look to the news more carefully and consider how I can blend the constant and ever-changing geographical world with the geography classroom.

Geography in the news? Yeah, OK.

GUEST POST – Developing schema and unearthing misconceptions: Connection Walls @Geogthorne

**Incredibly grateful to Suzanne Thorne for sharing her thoughts and expertise here. A really fascinating approach – certainly one I will be looking to apply to my own teaching as we adapt to our new normal! Make sure you give Suzanne a follow, here @Geogthorne**

Last term during our period of remote teaching it became increasingly difficult to use verbal questioning to inform our teaching and as a class teacher our understanding of our pupil’s gaps and misconceptions was more challenging to identify. On return to the classroom, but without the same flexibility to live mark, identifying pupil’s schema and unearthing any potential misconceptions or gaps in the understanding has remained more challenging. 

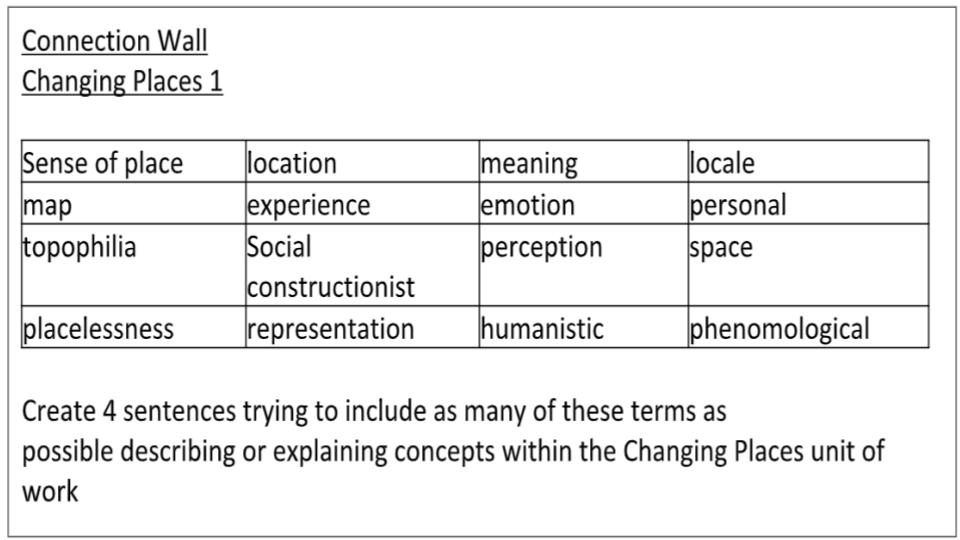
As a result, we started using connection walls. The concept is simply to present pupils with a low stakes task where they aim to create 4 sentences from the 16 subject specific vocabulary terms within the connection wall. They can, if they need, use more than 4 sentences to use all 16 words, they can ask questions and check word meanings, but the overall aim is to use all the terms and make connections between the terms. 

This has helped in a number of ways: ​

  1. Allows pupils to think critically to find relationships between concepts and develop deeper thinking​
  2. Can help identify misconceptions/ misunderstandings which can be addressed
  3. Helps make connections and supports creation of a pupil’s schemata​
  4. Encourages the use of tier 3 vocabulary​
  5. Helps pupils develop longer written responses
  6. Supports understanding of word meanings​​
  7. Identifies gaps in knowledge of subject specific terms
  8. Aids recall and retrieval of previously taught content​
  9. Draws on prior knowledge and makes connections between concepts

Two examples

  1. AQA GCSE- Challenge of Resource Management
  2. AQA A level- Changing Places

We are extremely fortunate to be an iPad school, so pupils can upload their responses via an app and some element of live marking and feedback can be conducted, within time constraints of the lesson. Pupils readily share great sentences and they are very receptive to checking their understanding of the key terms when they feel uncertain. The quality of writing and inclusion of subject specific terms (tier 3 vocabulary) is improving along with the confidence of how the elements of the knowledge and understanding can fit together. More able pupils are demonstrating more synopticity in their responses drawing on some prior understanding and reducing the amount of compartmentalising of topics, which we can sometimes suffer from as a subject. It has also given us some rich feedback and allows more targeted and responsive teaching to feed forward into lesson planning addressing any issues identified.

How I teach… Using booklets

I tweeted earlier in the weekend that I was spending some time working on booklets and shared a little snapshot of what they look like, here. This seems to have generated some interest and so I thought I’d breakdown some of the thinking behind using booklets and what their use looks like in the classroom.

When I say booklet, I mean a complete workbook – the booklet replaces the need for a separate exercise book (though I encourage A-Level students to run a notebook alongside the booklet) as it contains everything. Class notes, exam practice, homework and independent work. This means they can become quite a sizeable document! For large classes/key stages, this can spell the death kneel for the booklet because of the demand they put on photocopying – which has sadly been the case for us at Y7 and 8! Next time…

It’s important to point out here that I DO run a PowerPoint presentation alongside my booklet. However, this is largely to display images/text/diagrams/maps/graphs. By removing text – and putting it into the booklets – I am able to better focus student attention.

I have embedded the use of booklets at A level, so far. As this is the first year of using booklets, I am drip-feeding them out to students – the relevant lesson pages at each lesson – meaning they can file them away and build up the full booklet as we progress through the topic.

So, how do we teach from the booklet? I will illustrate using some example pages here.

A snapshot of some of the booklet pages we use.

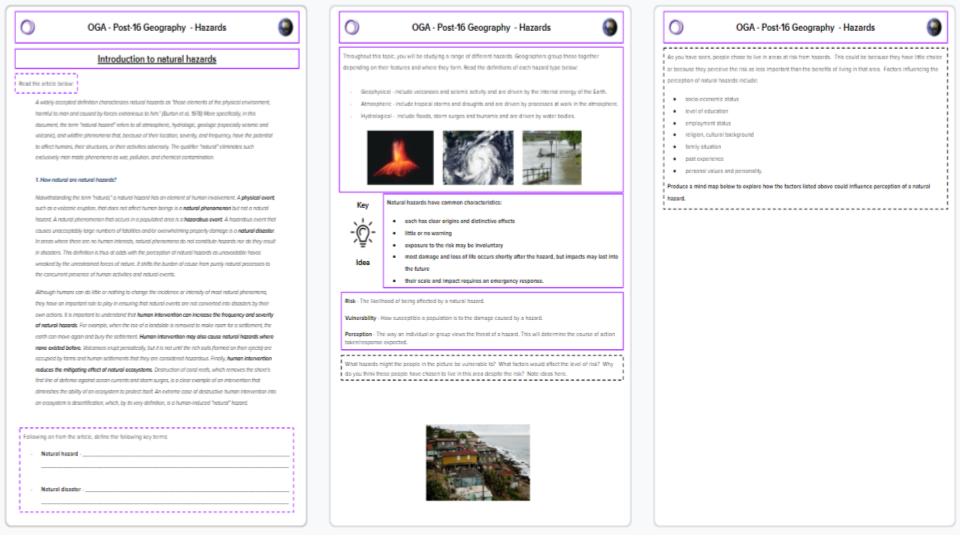
These three pages introduce the start of the hazards unit (AQA A level Spec) and encapsulate nicely what our booklets look like and how we teach from them. Page 1, on the left, has a title (usually a question) which we unpick as a class and then a 3/4 page of text. Students read this independently, adding annotations and identifying new language. After they have read this text and shared their thinking – I will pose a series of questions, based on the text. As students answer these – I will live annotate the booklet, under the visualiser. This is an important step as it is the process of modelling how we interact with a text and guides students note taking. Finally, at the bottom of page 1, we can seek space for some brief independent work – this example is students defining key terms. This is done by the students, and checked by me.

Page 2 involves some more brief notes – which students read, we question and annotate together – before applying these ideas to an image below. This example is asking students to apply their new understanding of vulnerability to a geographical location.

Finally, page 3 leaves students space to create their own mind map. The focus here is on perception – and the factors which affect it. Students would be expected to mind map the ideas and illustrate links between them. I would model this to students initially before they take over and work independently. This is a typical flavour of how we have utilised booklets – we expect students to read and engage with texts at length (the extract on page 1 is lifted from some academic reading), apply their knowledge to new examples and ask them to work independently.

I have added another example of booklet pages here:

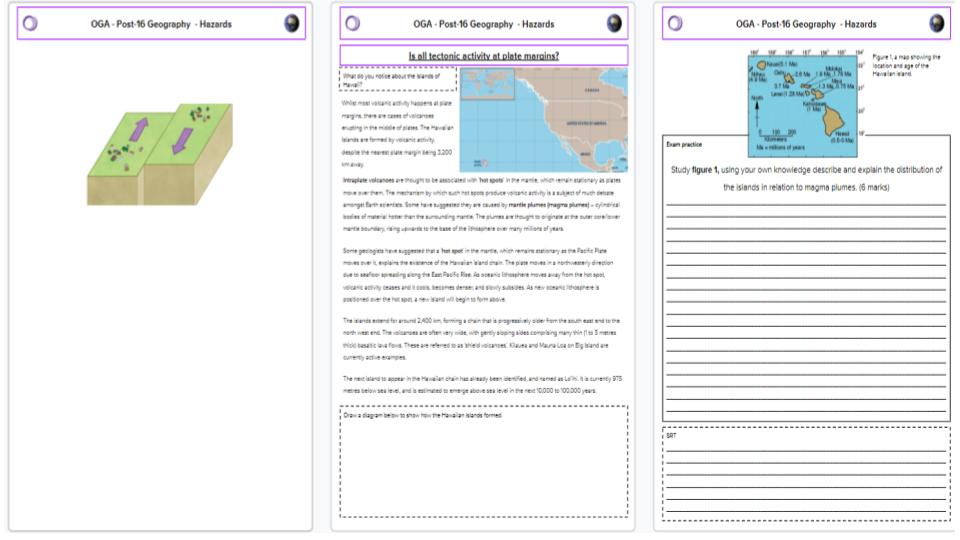
These pages further exemplify how we use booklets to teach. The first page – showing a diagram of a conservative plate margin – is blank. This allows me to teach, under the visualiser, and model note taking for students. Alternatively, I will teach this from the board and students would apply to their own booklets. This is an example of where we are expecting independence – an important focus for us in introducing these. The second page – titled ‘Is all tectonic activity at plate margins?’ is introducing students to magma plumes and intraplate activity, giving students another 3/4 page of text to read before applying knowledge in the space below ‘Draw a labelled diagram to show the formation of the Hawaiian islands’.

Finally, page 3 brings all of this together in the form of an exam question – with this 6 mark Q asking students to respond to a figure. Exam practice is built into the booklet throughout, giving students space to practice.

This gives you an idea of how we use booklets so I just want to finish with some practical advice on how we put them together. When I first started on booklets earlier this year, I was fortunate enough to get some great advice from a number of twitter teachers who helped me think about organising text, images and the flow of the booklet. These are the typical formatting guidelines I follow:

  1. Font size 11, no smaller as it becomes too densely packed any larger and it becomes a nightmare to get booklets to a reaosnable length
  2. Spacing 1.5, once again ensuring text isn’t too densely packed.
  3. Images should be blown up to a good size – zoom into 100% and see how legible they are. Don’t be tight on using great images/maps/graphs.
  4. If you are putting in text where they will be a lot to annotate – bring the text box in from the sides and leave ample room to annotate. Nothing worse than squashed up notes!

Final thoughts on a couple of things I need to do better:

  1. Ensure that the level of support from me is reduced as we move through a topic. Early on, I give students lots of support – live modelling and annotating – as they progress they will need to do this more independently as they listen to me teach.
  2. Booklets need to be flexible. They are a great resource – but don’t forget to share great articles/videos with students too – the booklet contains the majority of what I teach and want students to know but students have to go beyond the classroom, especially at A level.

GUEST POST – How I teach… Russia, using Prisoners of Geography @missbytheway

**This post came as a follow up to the recent #geogbookclub hosted by @geogbookclub. The first discussion centred on ‘Prisoners of Geography’ – fast become a go-to for geographers everywhere – and created some superb discussion. I was delighted when Miss Bytheway – who made some great points about her use of the book – agreed to share some thoughts on here as to how she has used PoG in her lessons.

Make sure to read to the end, as she has kindly agreed to share her resources – wonderful Geography community in evidence again!**

My first piece of advice before you think about planning a lesson or scheme of work on a book is, of course, to read the book. I actually read Prisoners of Geography twice as I felt there was a lot of information to take in the first time round.

Assuming you have now read the book, it is still hard to know where to start, right? I hope that this blog post will give you a starting point, resources or even just ideas. It is worth pointing out here that this lesson has been planned for my NQT school in September, so it is more of a ‘how I plan to teach’ rather than ‘how I teach’. I unfortunately did not have the opportunity to teach geopolitics in either of my placement schools, so these are just my initial plans, and like all teachers, I am always learning and reflecting to better my teaching. This lesson is currently the third of a series of three Year 8 geopolitics lessons. The first two are not solely based on the Prisoners of Geography book but do take ideas from it, these lessons aim to introduce students to the concept of geopolitics and to gain some understanding of global borders and conflict. I have included the resources for all three lessons in a shared Google Drive folder, which is linked at the end of this post.

PoG

Tim Marshall points out that while geography is not the only factor in global politics, it is definitely one that is overlooked. I completely agree with this and it is for this reason that I feel we would be doing our subject a huge disservice by teaching political themes without discussing the location and physical aspects of countries or regions. This lesson aims to answer the enquiry question ‘Is Russia a prisoner of its geographical location?’, the idea for which came from a chat with Tom Hanson (@hano_teach on twitter) about some remote learning he had set based on Russia, again using the Prisoners of Geography book. This enquiry question enables you to cover Russia in quite some detail, encourage critical thinking and explore various passages in the book.

I will start the lesson with a retrieval practice activity, aiming to reactivate some of the key knowledge students will use. The first use of the book comes after the starter activity. A passage from the book introduction is used to begin to understand how powerful the land we live on is. The passage I use can be seen in the resources PowerPoint, although many others could be used in place of this.

I plan to start off by reading the passage, students will then take part in a discussion surrounding which part stands out to them the most and why, this will begin a series of annotations on the passage. We will move toward unpicking the language used and discussing each geographical idea in turn. For example:

“What do we mean by social development? How do rivers specifically shape our planet and the way we live? How can they benefit us, but also how can they provide challenges?”

As this lesson is based on Russia next, I need to introduce the country in some way. I have found that ArcGIS is a good way to do this in many lessons, it allows you to explore a country’s location and size in relation to others. It allows you to add, remove and present data differently. The base map can be changed to explore different features… Can you tell how much I love using GIS in the classroom yet? The map which is linked in the lesson PowerPoint includes three layers; time zones (used to show the size and one challenge Russia faces), tundra biomes (an aspect of physical geography that provides both protection and challenges to Russia) and mountain ranges (these provide natural borders in and around Russia). I will also use the measure tool to present the vastness of Russia and compare it to distances students may be more familiar with, for example Birmingham to Tenerife. 

At this point in the lesson students have explored possible ways the land in which we live can shape our lives and politics and have some background knowledge of Russia. It’s now time to begin exploring the enquiry question in more depth. The blessing and curse of its location will be discussed and debated using various passages in the book (mostly from pages 5, 6 and 11).

I particularly like the first paragraph on page 11, it highlights that while Russia’s physical size and abundance of natural resources may bring it power, this does not come without equal difficulties. Russia does not have a huge population to match its size, nor does it have optimum climate conditions for farming in many regions. The country’s military will also be discussed using passages.

Following this, students will make informed decisions on whether they think Russia’s geography is a blessing or a curse to write a conclusion for a discuss question. The purpose of this is NOT to use an exam command word, nor is it to get students answering exam questions this early on, but to build on their critical thinking skills by weighing up the information they have and making a well-informed decision. There is no right or wrong answer and students need to be encouraged to form an opinion and use evidence to justify this. The final part of this lesson will be a learning pyramid, I thought it was important to include this kind of AFL both for the students and me after it being the first-time teaching, and the students learning about, geopolitics. 

As this lesson is heavily reliant upon class discussions it is vital that you focus on good quality, question and answer throughout, for both differentiation and to assess progress. Asking students to explain why a peer’s answer is good or what they can add to it can really develop class discussions! I have thoroughly enjoyed writing this blog and I am going away with several ideas after having reflected upon this lesson plan and resources. I hope you have found some use too!

All resources can be found here: https://drive.google.com/drive/folders/1W8KvkvcOHJ2ON03kZOvmyl3r9_HDrfMv